Scheduling
The Scheduling page allows you to schedule the pre-creation albums on your workspace. If you find yourself creating the same albums everyday, this tool can help save you time. When creating a schedul…
The Scheduling page allows you to schedule the pre-creation albums on your workspace. If you find yourself creating the same albums everyday, this tool can help save you time.
When creating a schedule you will have two options.
- Fixed Schedule
- Runs at specific intervals and days of the week.
- Rez System Triggered
- Powered by Integrations, this looks at Tours sent over by Reservation Systems and automatically creates albums when tours are scheduled. Requires an Integration to be setup. See Integrations
Create a Schedule
- Navigate to "Workspace" from the Left Hand Menu then the submenu item "Scheduling"
- On the top right click "Create"
- Select the Store you wish to create this album for.
- Continue below by selecting the schedule you want
Scheduling Type - Fixed Schedule
Runs at a specific interval on the days of the week you like. Select this if you don't use a Reservation System and your tour schedule is consistent.
- Schedule for when you wish the album to be created.
- Select which days of the week you wish this album to be created on. At least 1 day is required.
- Select at what time you wish this album to be created at.
- Albums will be created at approximately this time, and actual creation time may vary by a few minutes.
- This time is set to the Timezone of your account.
Scheduling Type - BETA Rez System Triggered
Powered by your Reservation system, albums are created when tours are scheduled. Right as the tour goes out the new album will be created.
- Once selected, a dropdown will appear allowing you to choose which tours this rule applies to.
- You can choose to either create for all tours, or select tours (must select at least 1 tour)
- You can choose to allow partial tour name matches, which will create albums for any tour with the selected tour in its name.
Beta Limitations:
- Albums will be created within the first 5 minutes of the hour, and the first 5 minutes of the half hour.
- Majority of Rez Systems only provide info on new bookings after the integration is activated. This means we may not have any bookings created before the integration date.
Continue Configuring the Schedule
- Set the album details
- Choose if you want to create an album for each booking in the tour or not.
- Set an optional name to create this album with. It is okay to leave this field blank. A good example name would be "9am Raft"
- Alternatively, if you are using a "Rez Trigger" you can toggle on "Use Name of Tour" and/or "Time of Tour" if you want us to use the Tour Time and Name from the reservation data
- Select any Souvenir Albums you wish to be automatically added to this album. You can select multiple Souvenir albums if you wish. Otherwise you can leave this option blank.
- If you wish to price this album differently than your default, set an Override pricing. Otherwise, we recommend leaving this option blank or with "Use Default" selected.
- Select if you wish this album to be visible on the Online Store or not.
- Lastly, choose how many albums should be created for this rule. Each additional album will have a number appended to it. Eg. "3pm Bob's Raft - 1", "3pm Bob's Raft - 2"
- Activate Rule
- Select Create
List of Schedules
You can view a list of existing schedules by navigating to Workspace -> Scheduling.
A Schedule Entry
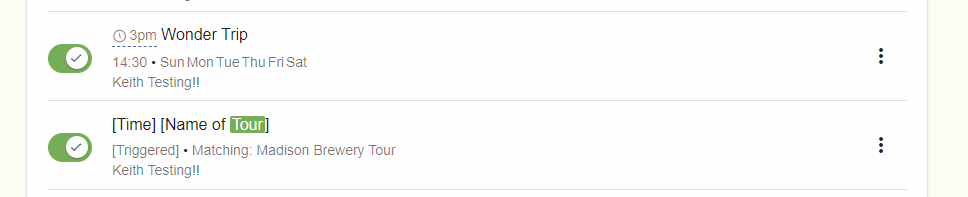
Each existing scheduled album will appear on the Scheduling page. Each row will show you:
- The name of the album. Eg "8am Tour".
- If you see "[Time]" then the Rez time of the tour will be input in front of the name.
- If you see "[Name of Tour]" then the name of the Tour will be put in front of the name.
- What time (in 24 hour/military time) the album is schedule to be created at. This is local to your account's Timezone setting. Eg. "02:00"
- Alternatively, this will display "[Triggered]", meaning it will be created when the Rez system has a scheduled tour.
- What days of the week the album is scheduled to be created on. Eg "Sun Mon Tue Wed Thu Fri Sat"
- Alternatively, this will display "Matching", followed by a list of matching tour names.
- What Store this album is for. Eg "Keith Testing!!"
- Optional. If the album is a hidden from the Online Store the text "Hidden" will appear on the far right.
- Optional. If any Souvenir Albums are selected, they will appear next to the Souvenir Mountain Icon. Eg "Souvenir"
- Optional. If any override pricing is set, it will appear next to the $ icon. Eg. "Initial Pricing"
- The Menu (three dots on the far right)
Edit a Scheduled Album
- Find the Schedule you wish to edit.
- Click the three dots on the far right
- Click "Edit"
- You can then change anything about this schedule. Be sure to hit save!
Delete a Scheduled Album
- Find the Schedule you wish to edit.
- Click the three dots on the far right
- Click "Delete"
How did we do?
Recycle Bin
Selecting Photos/Videos Inside an Album